Recently, Google introduced Google Analytics 4 which is a new property different form Universal Analytics properties that most people used in the past for tracking their website for Google Analytics.
New Google Analytics 4
The new Google Analytics 4 property allows a website, an app, or both with website and an app to be used for reports thus simplifying the process for many developers who own both, since apps are now the rage.
However with this new property, I found it difficult to find out how to exclude internal traffic (my own traffic to edit the site kept getting logged in Google Analytics, ugh) from say Google Analytics, whenever I was setting up this website. You see for quite a while people wrote ways to block internal traffic with the previous version of Universal Analytics Property which was useful to learn but with the new Google Analytics 4 Property, the articles are rare so I had some trouble digging up the instructions.
Before I begin, I’d like to preface this article by saying I am not an expert at this, and there are far more knowledgeable people than me in this area but this method that I listed worked for me, and I hope it works for you.
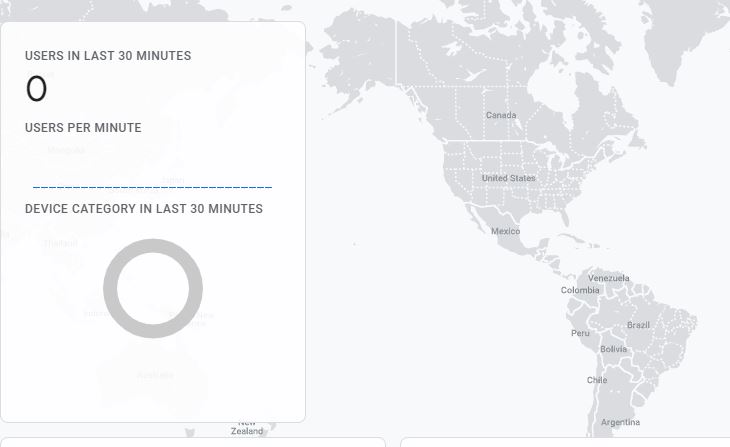
Now the Google Analytics is a great tool for seeing the health of your site and how many visitors you get and analyzing many things related to your website, but one annoying thing is everytime you log in to check on things or write articles, the Google Analytics logs you in as ‘Realtime User’ = 1 as default. This started to confuse me on who actually visited my site on the initial starting of my site and whenever I saw someone visit, I was let down to find out it was me.
Now once you follow these steps below and update your internal traffic exclusion, you should see a 0 Realtime user, which is admittedly kind of sad (in the beginning days of your blog anyways) but accurate.

Instructions for Google Analytics 4
So how do we get here? Well first of all login to your Google Analytics page which you hopefully already setup.
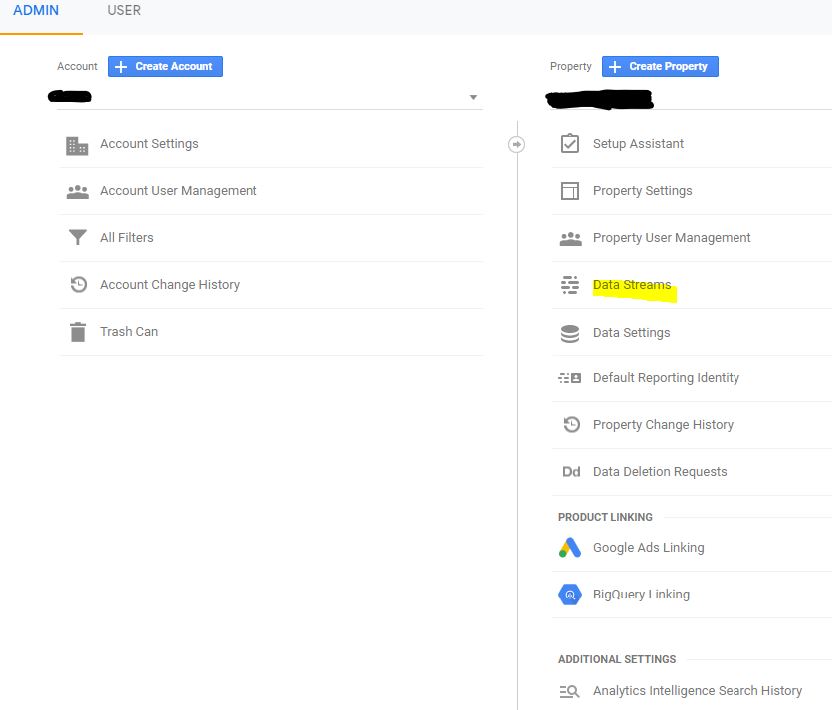
Once you’re in the main page, go down all the way to the bottom where it says Admin and click there which should bring you to a section that looks like this.

Now you want to make sure that you are in the correct Property, and in my case, I only have one website that I track so that’s pretty easy but for those who have several, choose the one you need.
Next click on Data Streams you see on the right (highlighted above).

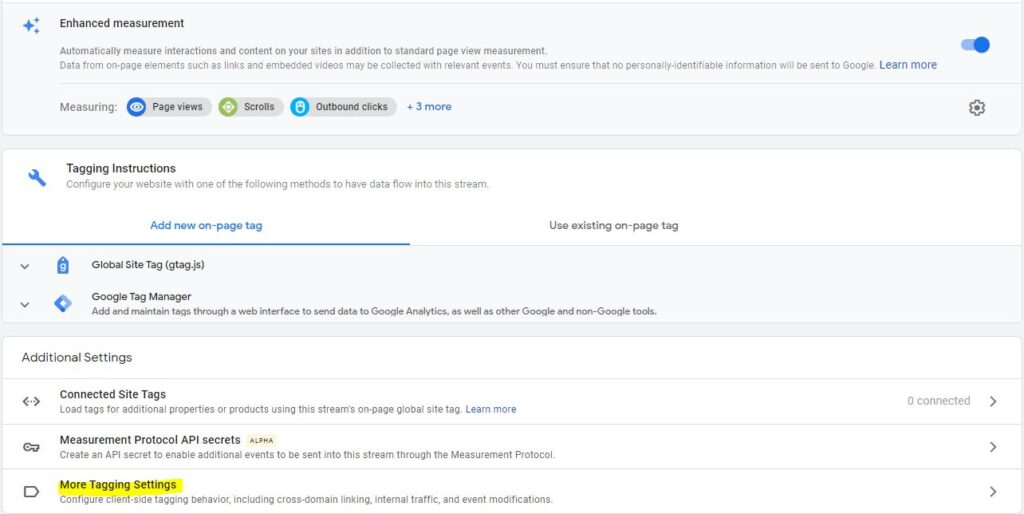
You will see a new panel of the website you are tracking. Click on that.

Once you do, you see a bunch of fancy things as shown above but for now you want to scroll down to ‘More Tagging Settings’ highlighted above.

And as you can see, you’ve hit the point where it says Define Internal traffic.
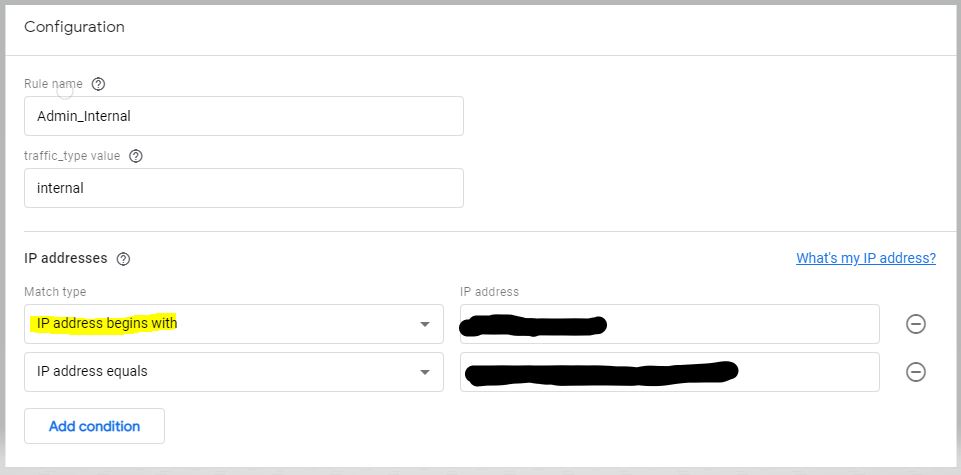
Next what you want to do is hit the Create button on the top right hand corner. Ignore mine that says Admin Internal, since I already created one for my Google Analytics Property 4.

Once you get in there you can see that you will see a way to choose Internal traffic and ip address equal to. In fact there are several options to choose from and I’ll explain what I did.

Here comes the easiest part of this whole exercise. Finding out your IP address. For that, open up a new tab and simply Google ‘What is my ip address’ which should get you your unique IP address right away.
Choose the Right Option
But here is the kicker, my IP address tends to dynamically change instead of being static so if I select IP address equals ‘XXXX-1234’, it might work for that day or that time, but eventually when my IP address changes, it will not work anymore. The method I found out away around this is that my IP address always starts with the same 18 characters whether I use my mobile phone or my laptop to access my site. So what I did was choose, IP address begins with and put those first 18 characters in. You might want to experiment with your IP as well and see what happens in the next few days after you set this up.
Also one thing you might realize is that the IP address that Google gives you when you search for it might be different from the one you are used to seeing like the 192.168….. instead it might say 2300:1222:4fo:3232 (totally made up) which is the new IPv6 type of IP’s vs the older IPv4. This is a good thing to use so fret not.
Once you finished setting this part up (don’t forget your mobile phone or other mobile phone in your house that accesses it with different IP if any) then hit Create on the top right hand corner and you should be set! Now when you go visit your site, and then go to Realtime on Google Analytics, you should see an accurate number like 0 excluding you from counting against the logging.
Again, I am not an expert in this so there are probably better ways to do certain things, but this works for me so far for a few months so if anything goes awry I will update this post. I hope that helps, and let me know if you have any questions about how to exclude Google Analytics 4 Property from Google Analytics.
